
Rosie Renovation: Master Plan + Before Photos


Rosie, meet the internet - internet, meet Rosie! She's a 1969 Globestar vintage travel trailer who's spent the last several years of her life in West Virginia. Before West Virginia no one really knows what kind of life she was living, but now she lives with us here in New Orleans, and we're about to give her the best makeover, like, ever.
WHY DO YOU GUYS WANT TO DO THIS THO?
Keeping it short and sweet: our friends Kyla + Jill renovated a similar camper last year and have been traveling around the country living their best lives and Instagramming the crap out of it. They came and lived down the street from us for a while and we were *inspired* by their nomadic lifestyle and cute tiny home. They are fountains of trailer renovation wisdom, which made us feel a bit more comfortable with taking on this project.
Also, we've both felt for a while now that we don't travel enough - especially considering we work on the internet and can more or less make our own schedule. So, after being remarkably envious of other vintage travel trailer renovations, like this one and this one and especially this one, we decided it was time to do it ourselves!
HOW MUCH DOES THIS COST?
This entire project can be done for about $10,000, depending on a few factors including the model of vintage trailer you buy, the condition it's in, AND what exactly you want to do to it. For instance, some popular models like Shasta trailers have become collectors items and can get extremely pricey. Other, lesser known brands such as our Globestar will run you around $3,000 - $5,000 if it's in decent condition and needs mostly cosmetic work. We've also definitely got to take a second here to thank eBay for partnering with us for this project, and we'll be showing you guys how eBay can be used to cheaply do pretty much every aspect of a trailer makeover, including the actual purchase and shipping of the trailer!
HOW LONG WILL IT TAKE?
Again, this depends a lot on the condition of the trailer when you acquire it, but for doing mostly cosmetic changes, you'll probably need somewhere between one and two months of working part time on it to get it where it needs to be!
OK WE DIDN'T ASK ANY OF THESE QUESTIONS YOU'RE LITERALLY TALKING TO YOURSELF NOW TELL US WHAT YOU'RE GONNA DO TO ROSIE
Dang, OK OK OK!
EXTERIOR 'BEFORE' PHOTOS
More on the plans for the exterior changes to come in another post, but here's what we're working with to start!


INTERIOR 'BEFORE' PHOTOS + PLANS

BED || BACK OF ROSIE
Rosie's an efficient lady and can actually sleep up to six people in her 3 (!!!) beds. There's the bed that gets formed by collapsing the dinette table and cushions, there's the bunk bed with a ladder to get to it (second photo below), and there's the main bed which folds out like a futon (green + orange thing below). But, like, there's no way we'd be able to comfortably have six people exist in this small of a space for more than maybe seven minutes and honestly the bunk bed feels like a coffin because your face is roughly 5 inches from the ceiling when you're lying in it. So, bunk bed, you are the weakest link. Goodbye.
In it's place, we're installing some extra storage shelves along the metal tracks pictured below, right above the window. We're thinking a light finish wrap-around shelf with a brass or copper bar to hold all of our things in place. Additionally, though the futon is convenient for creating space while the bed isn't being used, it's remarkably uncomfortable and we have no real need for a sofa (which is what it is in it's 'up' position). So, we're going to replace it with a permanent twin XL bed (using Bear Mattress because we've literally been sleeping like goddesses on their active recovery mattress we have in our bedroom). The 'headboard' wall of this bed is the wall in the first photo below with the large window. We'll be making this an accent wall with some cute Rosie-inspired floral wallpaper.


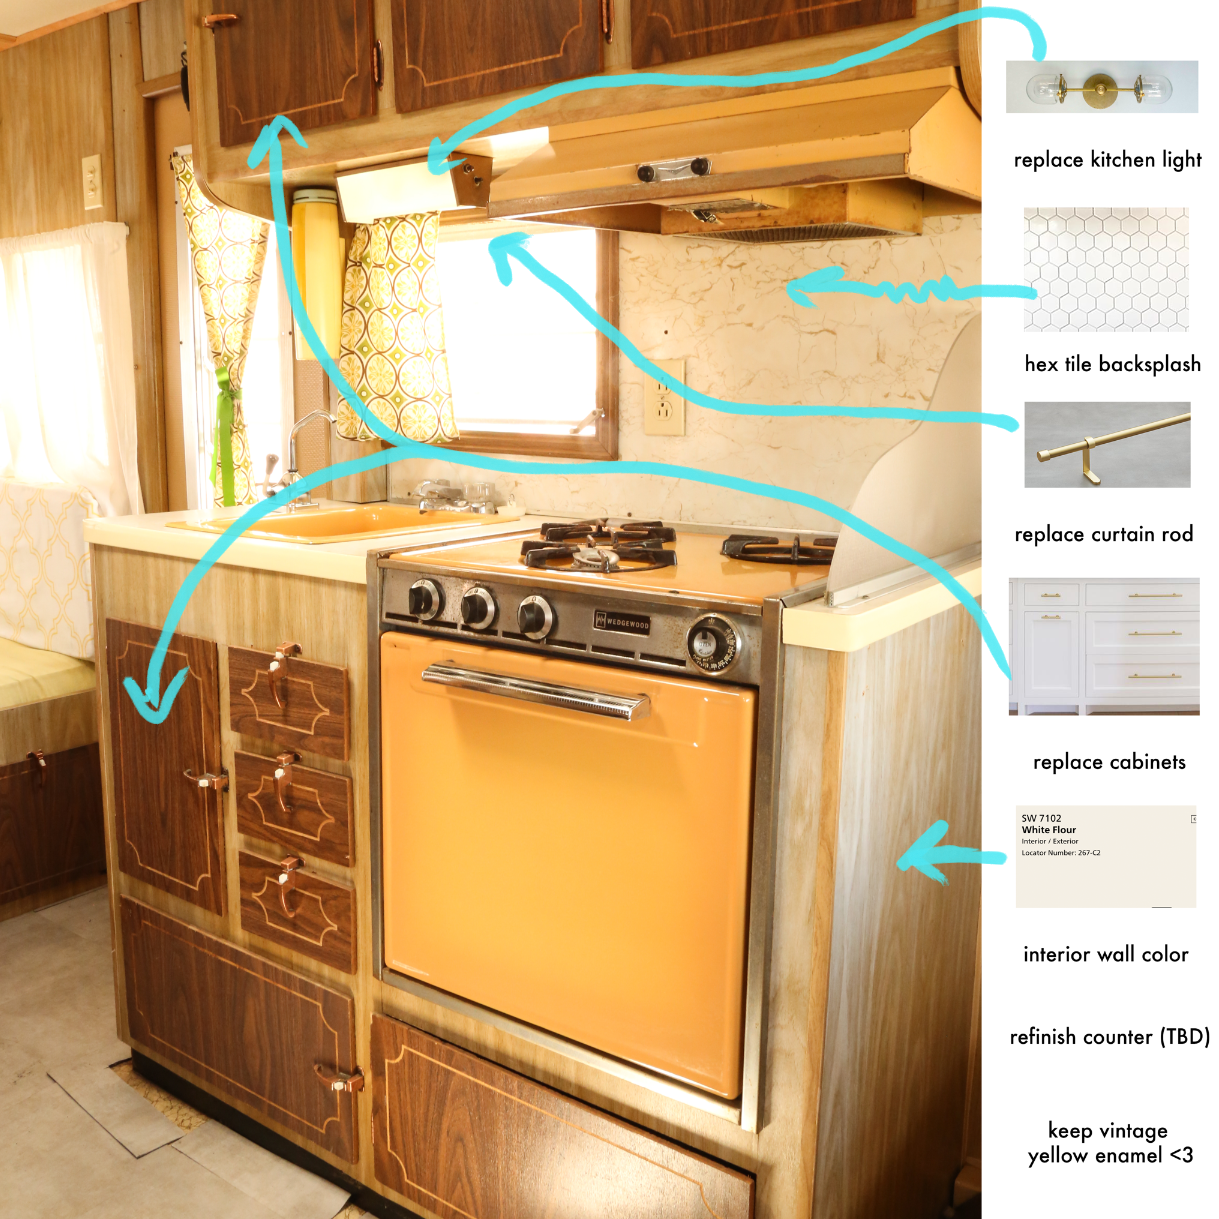
THE KITCHEN || MIDDLE OF TRAILER
The little kitchenette is where Rosie's vintage bones shine through the most, and we love it! The yellowish / orange enamel situation is adorable as heck and we're for sure keeping that completely intact. We'll be painting the interior walls of the trailer a cream color (once we actually have a color finalized we'll put it here for reference), and that will include the wooden base of the kitchenette - so, the part of the wood the cabinets are on. The cabinets are kind of flimsy and will be updated with either natural wood with a very light stain, or white cabinets. The plan for the hardware is copper or brass, and we're going to need to find a way to secure the cabinets so they don't swing open when we're towing the trailer. The backsplash will be hex tiles, and the counter is going to be refinished, likely with a concrete counter finish.
Directly across from the kitchen is the mini fridge, a small closet, more cabinets and drawers, and a tiny shower bathroom situation. We'll be matching these cabinets and drawers to the ones in the kitchen, and replacing the chalkboard face of the fridge with something a bit more ... with the times.


THE DINETTE || FRONT OF ROSIE
We'd mentioned the dinette contains the second bed in this thing - and if you're not familiar with these trailers that may sound real confusing. Basically, that single leg of the table below folds up to the base of the table, and then the entire table comes off the wall and gets lowered to rest on the small groove on either side of the seat beneath it. Then, the cushions push in to form a bed. It's not the most comfy thing in the world, but it'll do for a guest to sleep on for a night or two.
The plan for this space is to replace the cabinets up top with cabinets matching the new ones we're installing in the kitchen. We'll be replacing the ceiling light fixture with a brass fixture that can be adjusted to hang low or high depending on whether the dinette is being used as a dinner table / office or a bed. We'll also be painting the back wall and seats the same cream color as the rest of the trailer, and reupholstering the cushions with a creamy & black polka dot fabric. The table may just need to be re-finished, orrr we're going to go all the way and replace it with a light stained wood with a brass or wood support leg. This part of Rosie is going to be a 'see as we go' thing!


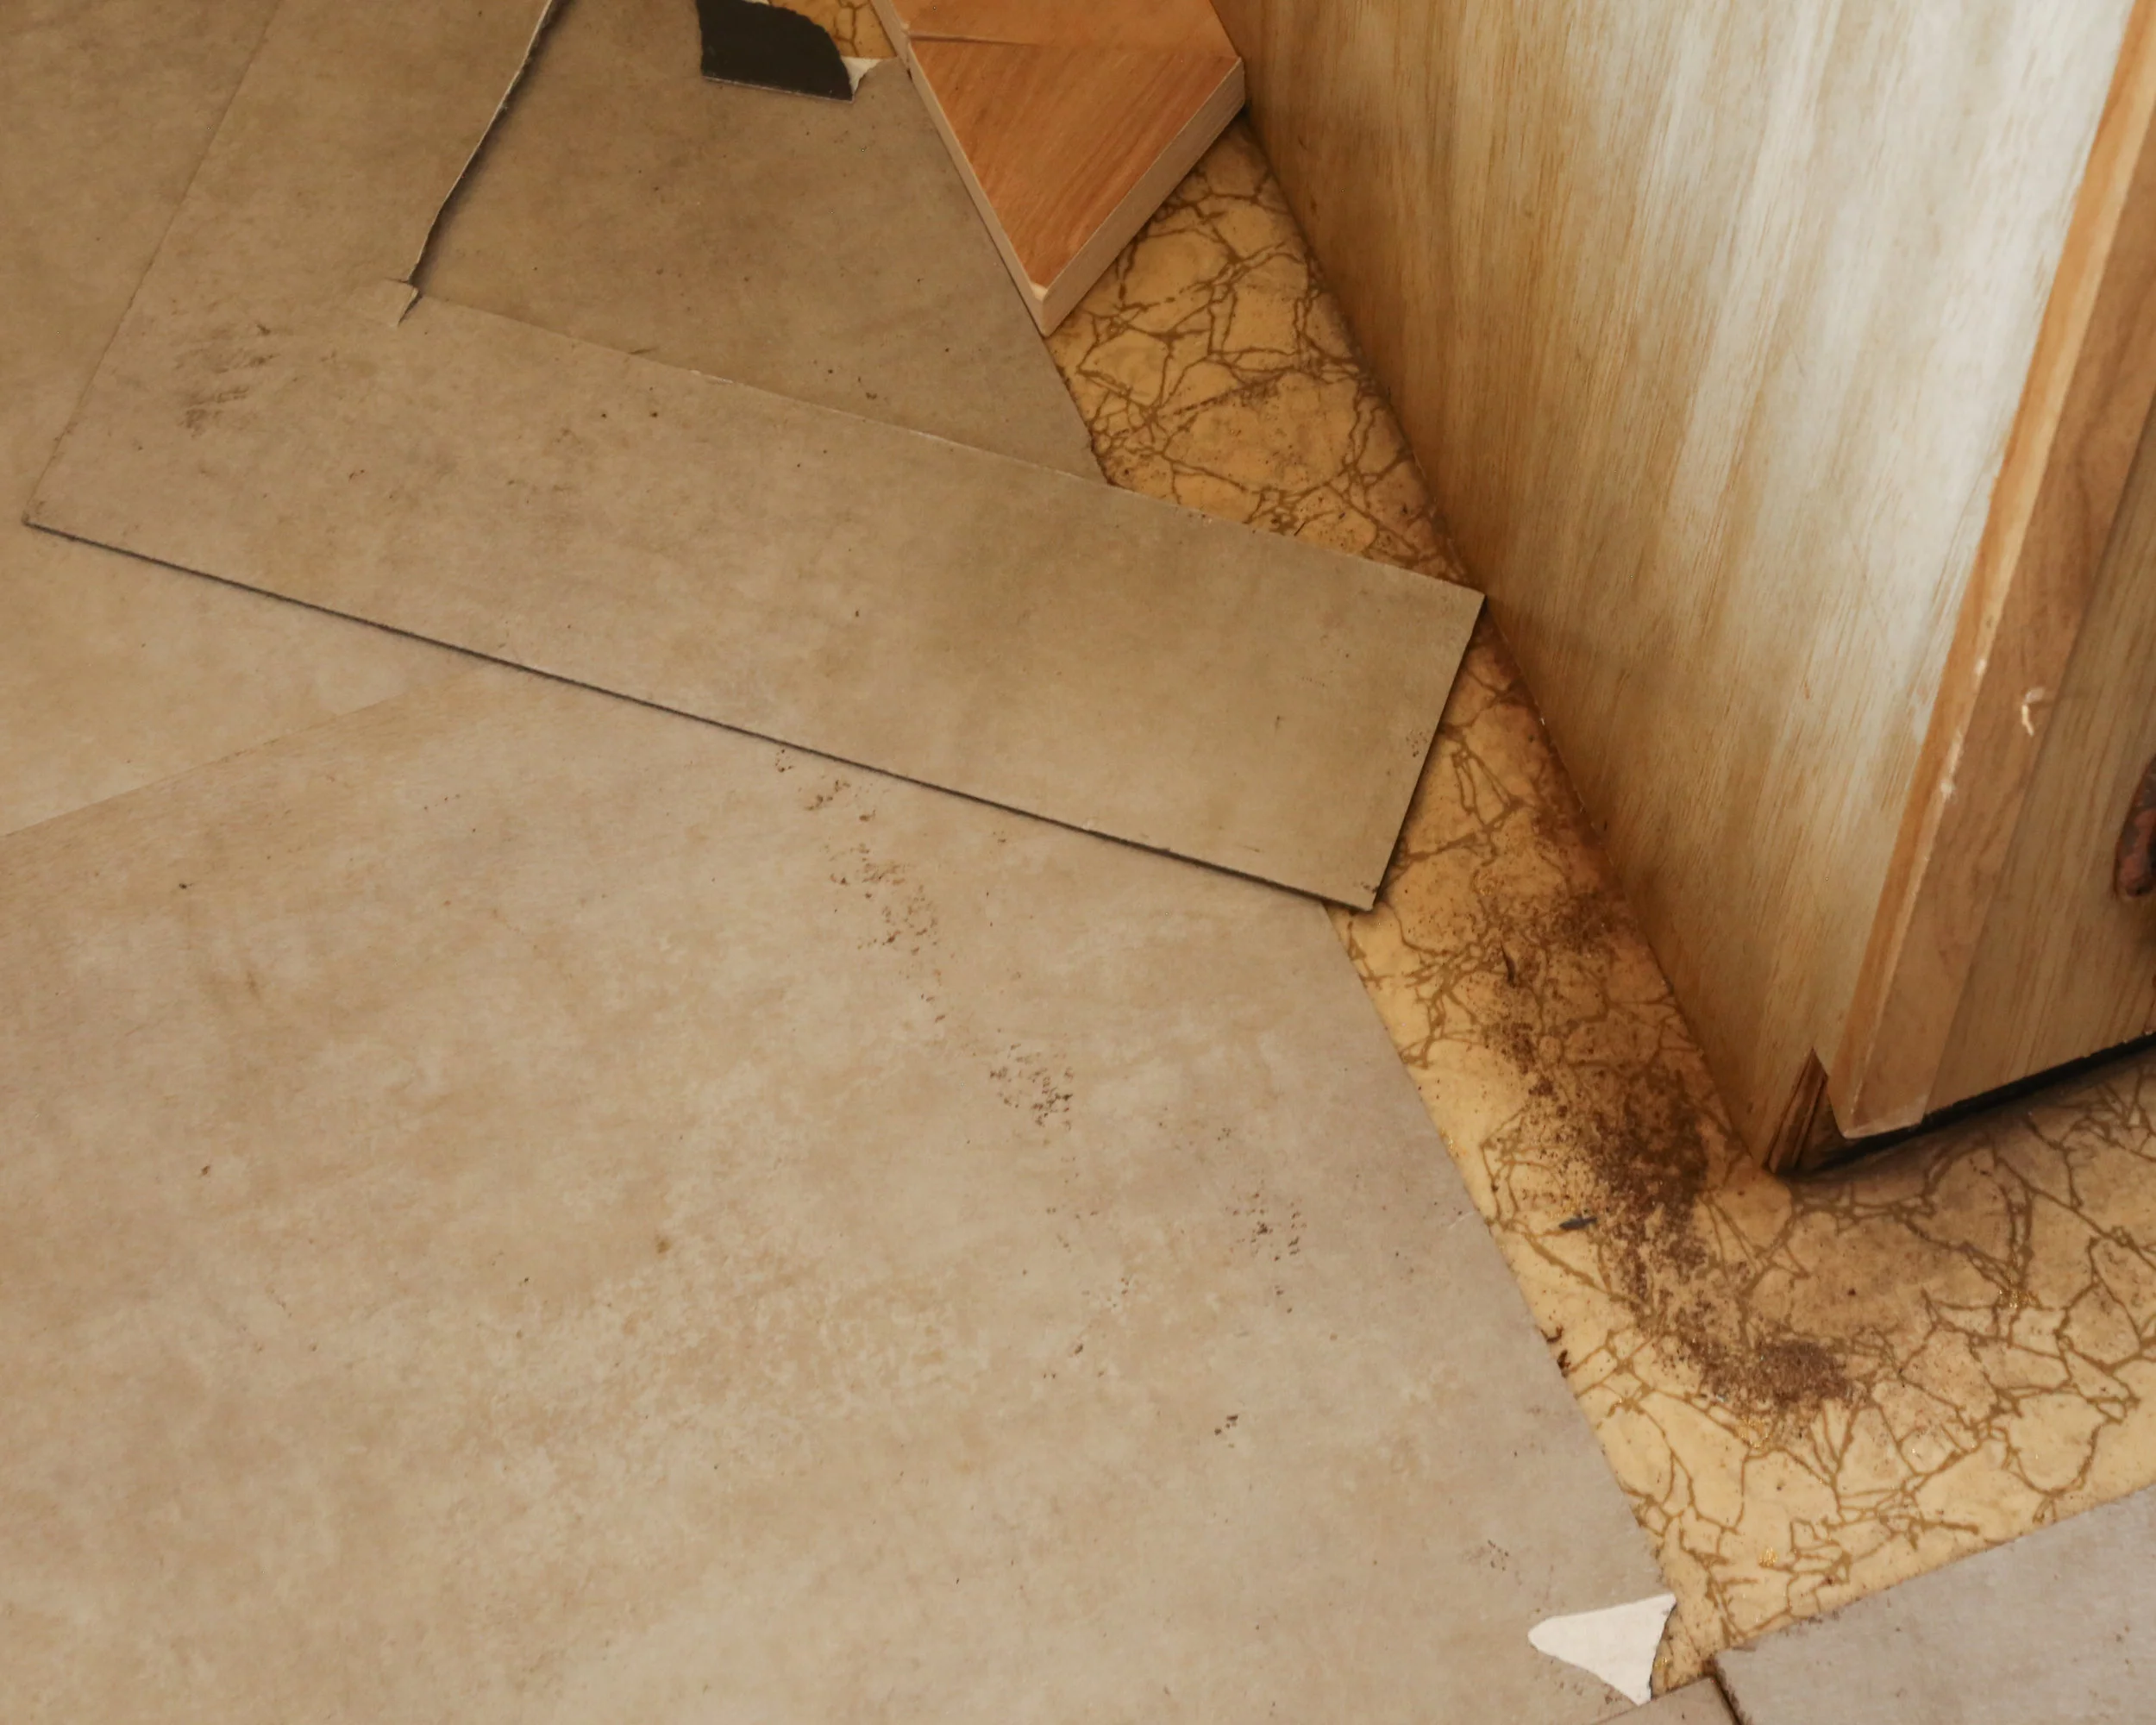
THE FLOORS
The floors are something we knew would definitely need to be replaced before we even saw Rosie. Currently, they're just stick-on tile, and beneath that is the original flooring but it's stained and worn down. So, we're going to be laying down light stain cypress triangles as the floor, which we're thinking will help add some dimension to the space. Thanks a million to Vintage Revivals for inspiring this, it's one of the things we're most excited about!


We're loving this new addition to our little fam and can't wait to show her off in her *final form* and take her for a camping trip. We've got a ton of posts planned for this project, and we'll be frequently featuring smaller pieces on our Instagram story, so def stay tuned for footage of us sweating and looking super not cute. Let us know what you think!

